Building a Tiny Pencil Village
Originally written by Jade on 12/17/2018
Hi everyone! This is Jade here, CWPE's high school intern. I'm usually here on Sundays, when Caroline, Alyx and I wear our matching sweaters for Pencil Sweater Sundays in the shop. When I'm not partaking in pencil-related activities, I spend my time shopping for stickers, working as editor for my school newspaper's art department and teaching myself difficult physics concepts. Also, my favorite Goldfish flavor is parmesan.
The Inspiration

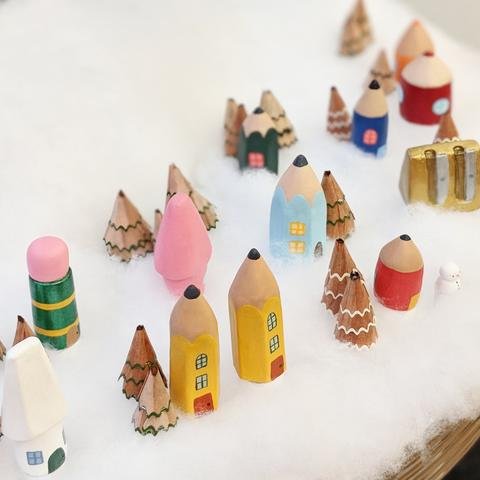
Back in August, Caroline entrusted me with the important task of illustrating a postcard for the December Pencil Box. Inspired by the cabin fever theme, I created a snowy village full of tiny trees and houses made of pencils, erasers, sharpeners and ferrules.
We also decided that it would be fun to turn my illustration into a real life diorama for the holidays! Now that it's holiday season here in the shop, I've finally gotten around to making it. Here is my process for creating the tiny pencil village.
The Trees
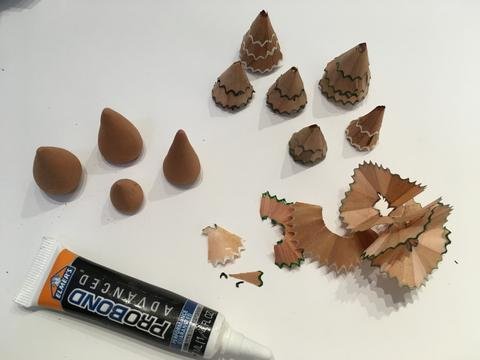
In my illustration, I drew all the pine trees to look like they were made of pencil shavings. To recreate them in the diorama, I used real pencil shavings and Kitaboshi air-dry clay. I sculpted cones of different heights out of clay, then produced tons of pencil shavings to glue around them in layers. This task actually proved to be quite tricky. Pencil shavings are very delicate, so it did take a bit of precision to make such tiny trees.
In the end, I found that certain pencils worked the best for producing clean, sturdy and continuous shavings: the Midori B, Tombow Dragonfly 8900 HB and Mitsubishi General Writing 9000 HB.
The Houses
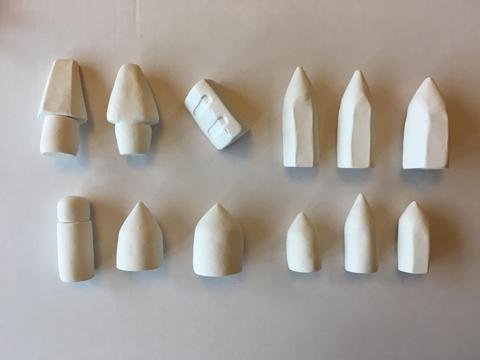
For the pencil homes, I decided to make everything out of white polymer clay. After working with the Kitaboshi clay for a bit, I realized I needed a firmer clay in order to create pointed edges. Sculpting the houses required some experimentation. Ultimately, I determined that the best method was to make the pencil barrels and points separately, then join them together. To make hexagonal barrels, I used a blade to slice six pointed edges off the side of cylindrical shapes.
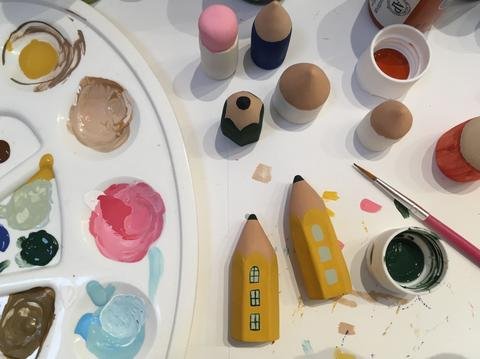
The best part of this project was definitely painting the tiny pencil homes! I loved choosing different color schemes of acrylic paint for each house. With some very fine pointed brushes and a lot of patience, I was able to add windows and doors to each one. I also used some metallic gold and green paints for the sharpener and ferrule homes!
Finally, to protect all that paint, I coated each house with a layer of matte varnish.

Putting it All Together
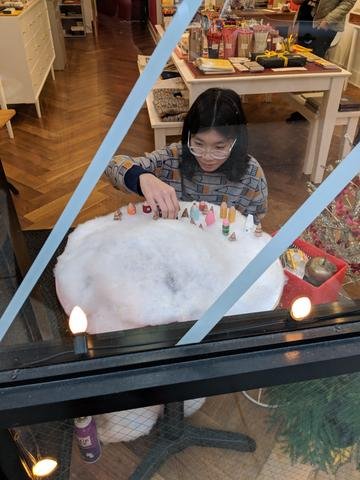
Once all the trees and homes were finished, I began assembling the final diorama. Caroline and I decided that the pink table by the door would be the best place to display it.
I covered the entire surface of the table with white paper, then started piling a thin layer of fake snow over it. Since our Christmas tree is being displayed on the same table, it needed to be elevated to make room for the village (for full transparency, I am now telling you that the snowy "mountain" that the tree is currently resting on is actually built upon a round Tupperware container filled with soil).
The snow was fluffy, almost too fluffy, so I quickly realized that in order to prevent the pencil homes from sinking inwards, they needed a sturdier base. I fixed this problem by rolling up some short paper cylinders and attaching them to the bottom of each house with double-stick tape, then placing them back in the snow.
Finally, I placed all of the pencil shaving trees around the homes. Voilà! The pencil village was complete. It's now on display for holiday season!
Special thanks to Caroline for trusting me with holiday decorating for the shop. I promise to keep adding on to the pencil village every year, even after I leave for college.
I hope some of you are inspired to make your own pencil villages for the holidays!